 | ||||
home / about the artist / stoneboat series / lipwork series / metaphorical presences / landscapes / multi-element installation pieces / recent works
technical processes / thumbnail galleries / Cortona foundry / Finland stone carving / recommended reading / all in the family / links page
Don Dougan
sculptor
www.dondougan.com
design for a shop-made carving stand
The Design of the Carving Table
The purpose of the carving table is to support the workpiece in a way that allows the maximum degree of both:
(a) stability while working; and
(b) accessibility to the workpiece.
To meet these criteria, the ideal table would have to be massive, sturdy and yet small and light enough to be easily maneuvered for working on all sides of the carving.
To combine these apparently divergent qualities there has to be compromise somewhere along the way.
The design of the carving table must take into account the environment of the carver, including the methods of working and the usual size and type of work being done. The carver who works primarily in blocks measuring less than 18" will require a different kind of table than the carver who regularly works in blocks measuring 36" or more.
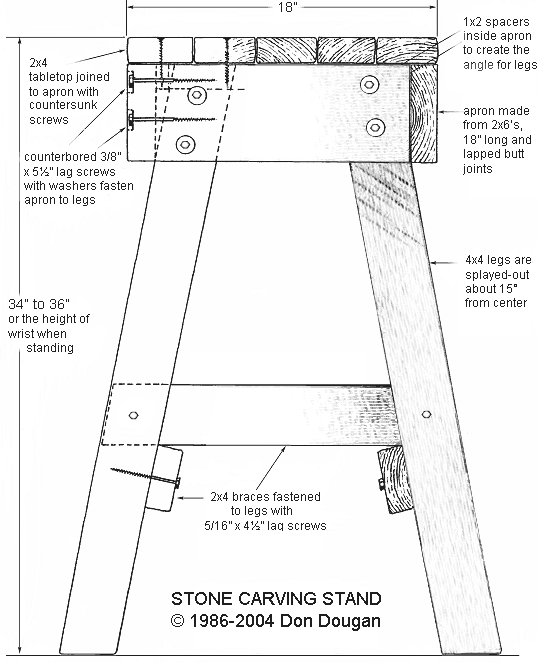
The materials and construction in this design for a carving table was based with the following primary criteria:
- the table should be able to safely support at least a 1000 lb. stone
- the table should be stable if even a small 20 lb. block was being carved.
- the workpiece on the table should be within arm's reach from whichever side the carver is standing and working.
- the table would be subjected to rough treatment by a variety of users for a number of years.
- the table had to be made as inexpensively and quickly as possible using the tools in the school's woodshop.
The design for the carving tables successfully met all these criteria, and they have been in use in the sculpture studio every quarter since 1986. The strength, stability, and durability of the tables is due to the relative stoutness of the legs, apron, and braces; and the strength of the lag bolts. The width and depth of the tabletop were kept to less than arm's length, while the legs were splayed-out to increase stability. The type of wood chosen was rough-sawn yellow pine; which is comparatively heavy, hard, and inexpensive. The compound angles of the legs were quickly and easily cut with the use of a custom-built holding jig to fit the large-diameter radial-arm saws in the woodshop. A pneumatic ratchet wrench was used to rapidly drive the long lag bolts into the pre-drilled holes.
Variations on this design which have also been built include:
- use of pressure-treated wood & hot-dip galvanized fasteners for a table which is permanently left outdoors.
- increase in width of tabletop to 18" x 36" to allow for habitual use of carving blocks generally twice as long as wide.
- down-sizing of dimensional lumber to 2x2's for the legs, 2x4's for the apron, 1x2's for the braces, ¾" plywood for the
top, and ¼" carriage bolts instead of lag bolts. *see LightDutyTABLE.pdf below
Customizing the Table to fit Your Needs: Mobility
If the table is going to be used in a studio where there is not room to walk all the way around it easily, a turntable bearing should be considered. The bearing would be mounted on the upper surface of the existing tabletop, and a second tabletop would be fastened on the top side of the bearing. To stabilize and prevent the bearing from turning during the working process, a pin can be inserted through the upper table-top into one of a number of pre-drilled holes in the lower table-top. Large sized 'lazy susan' type bearings will work for medium and light weight work, up to about 250 lbs.
Another option to make the table more workable in small areas might be to fit heavy-duty swivel casters to the legs, which would allow the entire table to be rotated or moved to different locations in the studio. The use of locking casters will prevent a possibly hazardous run-away situation, and will also help stabilize the table during carving, especially when working on smaller masses of stone.
The braces on the legs are ideal places to put a shelf to hold extra tools while working, storage for extra sandbags, or on which to place another block of stone as ballast to add mass and stability to the carving table.
click the filename below to view or download a 180KB PDF document of this table design
click the filename below to view or download a 95KB PDF document of a similar table design

These two designs also contain a materials list and step-by-step instructions on constructing the table.
The designs are readable Adobe Acrobat Reader, free downloads of which are available at http://www.adobe.com
Though not a working stand, the following pdf document covers the type of presentation or gallery pedestal I make for my own exhibits. The pedestals are lightweight and easily transported yet look every bit as good as pedestals that would be used in a large museum.
click on the filename to download and view or save the 255KB PDF file:

